Let’s be honest. Is there anything more heartbreaking than seeing a new scratch on your beautiful floor from a child’s toy or a pet’s excited dash? If you’re running a busy household, you need a floor that laughs in the face of spilled juice, muddy shoes, and constant chaos. So, what is the best flooring for a busy house that can handle all this and still look amazing?
The answer which more and more families are choosing is vinyl.
But wait, isn’t that the old fashioned sheet vinyl? Not even close! Today’s luxury vinyl is a total game-changer. We’re going to walk through the real-world benefits of vinyl flooring that make it such a smart choice. From being tough enough to handle your family’s busiest days to being a breeze to clean up after them, you’ll see exactly why it might be the perfect fit for your home.
Here are 6 reasons vinyl flooring is the best choice for busy homes.
Reason 1: Exceptional Durability
We just talked about handling the beautiful chaos of a busy home. But what does that actually mean for your floors day after day? It means you need the most durable flooring for home life. This is where luxury vinyl truly stands out from the crowd.
Think about your home’s hotspots. The entryway where everyone piles in with muddy shoes. The kitchen where chairs scrape back and forth continuously. This is flooring for heavy traffic at its finest. Now, imagine a floor that takes this like a champ. Vinyl plank is engineered with a super tough wear layer that acts like a shield. It resists scratches from dog nails, scuffs from toys, and the general wear of a family on the move.
Unlike other materials that show every mark, a quality vinyl floor is designed to hide the evidence of your family’s fun, making it incredibly resilient flooring for kids and pets. It’s the kind of long lasting flooring that lets you relax and actually enjoy your home.
Reason 2: Water and Spill Resistance
Now, we’ve seen how this flooring stands up to solid stuff like scratches and scuffs. But what about the liquids? A floor can be tough but still panic at the sight of a tipped-over water bowl. That’s where the next superpower comes in: this is high-traffic waterproof flooring you can truly trust.
Remember those hotspots we talked about, like the kitchen and entryway? They’re not just high-traffic; they’re also spill and splash zones. Whether it’s a knocked-over cup of juice, a trail of melted snow, or a pet accident, you need a floor that won’t throw a fit. Luxury vinyl plank is 100% waterproof.
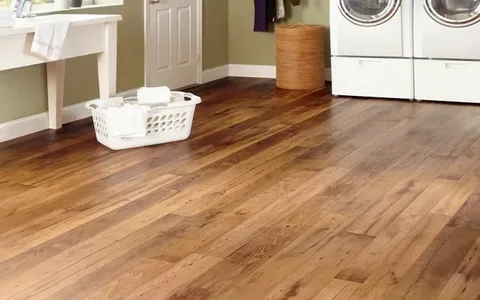
This means spills stay on the surface, giving you time to grab a towel without that fear of permanent damage. It’s this complete moisture resistance that makes it a champion in rooms like bathrooms, basements, and laundry rooms, where other floors might warp or swell.
Reason 3: Low Maintenance and Easy Cleaning
Alright, so we’ve got a tough, waterproof floor. But let’s get real. What good is surviving a spill if the clean-up is a huge hassle? One of the biggest advantages of vinyl flooring is how it gives you your time back. It’s the super easy to clean flooring solution for anyone who’d rather be relaxing with their family than scrubbing on their hands and knees.
Think about your typical day. Crumbs from breakfast, a splash of pasta sauce, a bit of mud tracked in from the garden. With vinyl, your cleaning routine is surprisingly simple. A quick daily sweep and an occasional damp mop are truly all it takes. There’s no need for special waxes or harsh chemicals. Its smooth, non-porous surface is naturally stain resistant, so common household messes wipe right up without a trace.
Reason 4: Stylish and Versatile Design Options
Now, you might be thinking, “Okay, it’s tough and easy to clean, but does it mean I have to compromise on how my home looks?” This is where modern luxury vinyl truly shines and shows why luxury vinyl is the smart choice for busy homes. It brings stunning beauty without the high cost of natural materials.
Gone are the days of limited, fake-looking options. Today’s vinyl offers incredibly realistic wood look vinyl flooring that captures the grain and texture of oak, walnut, or hickory. If you prefer the elegance of stone, you’ll find gorgeous stone look vinyl flooring that mimics slate, marble, or travertine.
This incredible design versatility means you can achieve any style, from a cozy farmhouse to a sleek modern loft, without the drawbacks. You get the high-end look you love, paired with the family-proof performance we’ve been talking about. It’s the perfect way to create a beautiful home that reflects your personal taste.
Reason 5: Comfort and Sound Absorption
So we’ve seen that this flooring is tough, practical, and can look like a million bucks. But a home is more than just looks; it’s about how it feels to live in. This is where the built-in comfort of luxury vinyl really makes a difference, especially in a bustling household.
Unlike cold, hard tile or echoing hardwood, vinyl plank has a gentle give that makes it much more comfortable underfoot. Think about those long hours you spend in the kitchen, or watching your little ones play on the floor, that extra cushioning is a small detail you’ll appreciate every day.
But the benefits don’t stop at comfort. All that activity can get noisy, right? The layered construction of vinyl acts as a natural sound absorber. This means less echoing and a quieter, more peaceful environment. This noise reducing quality is a true blessing, turning a loud and chaotic space into a calmer heaven for your family.
Reason 6: Cost-Effective and Eco-Friendly
By now, it’s clear that this flooring is a champion of comfort and style for your active home. But a truly smart choice also makes sense for your long-term budget and values. This is where the affordable nature and evolving eco-consciousness of luxury vinyl seal the deal.
Let’s talk numbers first. Compared to the hardwood or stone it so beautifully mimics, vinyl offers a much more affordable upfront cost. But the savings don’t stop there. Because it’s so incredibly durable and requires almost no maintenance, you’re making a cost effective long-term investment.
And for families who are planet-conscious, there’s more good news. Many manufacturers now offer sustainable vinyl flooring options made with recycled content and low-VOC materials, contributing to better indoor air quality. So, you can feel good about choosing an eco-friendly flooring option that doesn’t force you to choose between your home’s beauty and your environmental values.
Conclusion
So, there you have it. From its durability and waterproof nature to its easy cleaning, stunning designs, and everyday comfort, vinyl flooring is built for real life. It’s the one flooring for a busy house that truly checks every box, offering the perfect blend of practicality, style, and long-term value that active families need to live life to the fullest, without worrying about their floors.
Choosing the right floor is the first step; a flawless installation is what brings it all to life. If you’re a homeowner in the area, Almaraz Hardwood Flooring specializes in Vinyl Flooring Installation that ensures your beautiful new floor is fitted perfectly to last for years to come. Give us a call at 804-510-0451 or visit our service page at https://almarazhardwoodflooring.com/flooring-services/vinyl-flooring/ to learn more and get started on your project today
Frequently Asked Questions
What is the best flooring for a busy house?
Luxury vinyl is the best flooring for a busy house. It perfectly balances toughness, waterproof protection, and easy cleaning with stylish designs that handle daily family life.
What are the advantages of vinyl flooring?
The key advantages of vinyl flooring are its durability and practicality. It’s a high-traffic waterproof flooring that resists scratches and stains, and is incredibly easy to maintain.
Are high-end homes using vinyl flooring?
Yes. Luxury homes use vinyl because it shows why luxury vinyl is the smart choice. It offers the high-end look of wood or stone with the benefits of vinyl flooring, like superior durability and easy care.
What is the downside to vinyl flooring?
It can’t be refinished like hardwood if severely damaged. However, its tough surface makes it the most durable flooring for home use, designed to prevent such damage in the first place.
So, you’re thinking about getting a new carpet? That’s fantastic! There’s nothing quite like the feeling of a soft, warm floor under your feet on a chilly morning. But if you’re like most folks, you’ve probably heard a few rumors about the whole process that have you second-guessing everything. However, the truth is, a lot of what people believe about carpet myths is just that—a myth. And this guide is here to clear the air, so you can feel confident about your decision.
You might be wondering, “what are the real myths about carpet flooring I should know before I buy?” Well, you’ve come to the right place. In this guide, we’re going to walk through the biggest misunderstandings about carpet installation, and give you the real carpet installation facts from the pros.
So, here are 6 carpet installation myths you need to stop believing in.
Myth 1: Installing Carpet Is Too Hard
You’ve seen the home improvement shows where it all gets rolled out perfectly in a 30-minute segment, right? It makes you wonder, “how hard is it to install carpet for a handy person like me?”
Well, let’s be honest here. Is installing carpet hard? The short answer is that it’s a skilled craft, not just a weekend chore. The real question isn’t about brute strength, but about having the right knowledge and specialized tools. Think of it like cutting your own hair; the first snip might seem easy, but getting a professional-looking result is a different story altogether.
So, what makes it look so easy when the pros do it? It’s all about the tools for installing carpet that they have mastered. While you might have a sharp utility knife and a knee kicker, professionals use a power stretcher, which is the tool that makes sure your carpet is drum-tight, preventing any wrinkles and trips down the line.
So, while the process itself is a piece of cake for experts, it’s the skill and tools that matter. And speaking of precision, one of the biggest questions we get is about tricky surfaces, which leads us to our next myth about putting carpet on concrete.
Myth 2: Carpet Installation on Cement Floors Is Impossible or Risky
Remember how we just talked about tricky surfaces? Well, this is a big one. Many homeowners with basements or slab foundations are told that installing carpet on cement floor is a no-go. They worry about moisture, cold, and a feeling of it just not sticking. But the truth is, with the right professional steps, it’s not only possible but can create one of the coziest rooms in your house.
The secret lies in the preparation. Here’s how a pro tackles it:
Moisture Check: The first and most critical step is to test the concrete for hidden moisture. This prevents mold and mildew down the line.
The Right Pad: A high-quality moisture barrier pad is very important. Think of this as a super-powered raincoat for your floor which blocks dampness from below while adding a soft, cushy feel underfoot.
Secure Installation: Finally, the carpet is power-stretched over this special pad, locking it securely in place just like on any other floor.
So, a cement slab isn’t a deal-breaker; it just needs the right approach. And getting that approach right is a key part of the value a professional provides, which neatly brings us to the next big question on everyone’s mind; the price tag.
Myth 3: Carpet Floor Installation Cost is Very High
It’s easy to hear a number and think, “Wow, that’s a lot for just some flooring!” But let’s break down the carpet floor installation costs because what you’re really investing in is a long-term transformation for your home.
When you look at the carpet installation cost per square foot, it’s not just the price of the carpet itself. That final number includes the quality of the materials, the padding, the furniture moving, the old carpet removal, and the skilled labor to make sure everything is perfect. Compared to many other flooring types, carpet often provides more comfort and insulation for your budget.
Think of it this way: a slightly higher initial investment in a professional job can save you money for years. A poorly installed carpet will not only develop wrinkles and loose areas but also lead to premature wear, forcing you to replace it much sooner.
At this point, you might be thinking, “What if I skip the pro to save money?” That’s a tempting thought, and it leads us directly to our next big myth.
Myth 4: DIY Carpet Installation Saves Money
That thought, “I’ll just do it myself and save the labor cost,” is completely understandable. But the idea that DIY carpet installation is a surefire way to save cash is one of the riskiest myths out there.
Think about everything that goes into it. First, you have to rent all the professional equipment. Then, if you make one wrong cut, which is easier to do than you might think, you could ruin a whole section of carpet. Those unexpected costs can quickly wipe out any money you thought you were saving.
Here’s a quick look at some of the essential tools for installing carpet that a pro uses, which are costly and tricky to master for a one-time project:
Power Stretcher: This is the key to a tight, wrinkle-free carpet. Without it, you’ll get ripples.
Knee Kicker: Used for fitting carpet into corners and tight spaces.
Carpet Tucker: For neatly tucking the edges along the wall.
Seam Iron: To seamlessly and permanently join two pieces of carpet.
Even if you manage the installation, a DIY job often leads to problems down the road. Bumps, loose areas, and visible seams aren’t just eyesores, they cause your carpet to wear out much faster. So that “budget-friendly” project could actually mean replacing your carpet years earlier than you should.
So, while handling other parts of home renovation yourself can be rewarding, this is one task where the professional’s skill directly protects your investment.
Myth 5: Carpet Installation Is Messy and Inconvenient
Let’s talk about the elephant in the room. You’re probably picturing a giant mess, right? Dust everywhere, your cozy living room turned upside down, and days of noisy chaos. It’s a scary thought, and honestly, it’s the number one thing that makes people nervous.
But what if you were told that this picture is totally wrong?
Professional installers are basically cleanup ninjas. They know you live in your home, and their goal is to disrupt your life as little as possible. They roll out floor protectors the second they walk in, so your hallways stay spotless. They handle all the heavy furniture moving for you. And the best part? They do a full cleanup afterwards, even vacuuming your new carpet so it’s ready to enjoy.
The whole process is surprisingly quick. Often, a professional crew can transform a room in just a few hours. You can literally leave for your morning errands and come back to a beautiful, finished space in the afternoon. It’s that seamless.
Now, with the fear of mess and inconvenience out of the way, let’s tackle the final myth that oversimplifies the entire process.
Myth 6: All Carpets and Installations Are the Same
After talking about all these details, from tools to tidy crews, you might be starting to see the bigger picture. The final and perhaps most important myth is thinking that every carpet installation is the same.
The truth is, every home and every carpet is unique. The way you install a thick, plush carpet for a bedroom is different from how you handle a sturdy, low-pile one for a busy staircase. The shape of your room, the type of padding you choose, and even the lighting all affect how the installer works to give you the best result.
A true professional doesn’t just roll it out. They plan the entire process. They know how to position seams to make them disappear in certain lights, or how to stretch the carpet just right for a specific material. This approach is what makes the difference between a floor that’s “okay” and one that feels perfectly finished and lasts for years.
Conclusion
From difficulty and cost to mess and the myth of a one-size-fits-all approach, we’ve walked through the biggest myths. The takeaway is that professional carpet installation is a skilled craft that makes sure your investment is beautiful, long-lasting, and surprisingly hassle-free. It’s not about just laying down fabric; it’s about precision, preparation, and the peace of mind that comes with a job done right.
If you’re ready to move past the rumors and experience a flawless installation, let’s talk. At Almaraz Hardwood Flooring, our Professional Carpet Floor Installation service focuses on delivering a result that not only looks perfect on day one but stays that way for years to come. For a consultation or to learn more, give us a call at 804-510-0451 or visit our service page at https://almarazhardwoodflooring.com/flooring-services/floor-carpet-installation/.
Frequently Asked Questions
1. How much would carpet installation cost?
The total carpet floor installation cost varies, but you can expect a typical range of $3 to $7 per square foot. This price includes the carpet, padding, labor, and removal of your old flooring.
2. Can you install new carpet over old carpet?
It’s not recommended. Installing over old carpet leads to a soft, unstable floor and can hide moisture or subfloor issues, voiding warranties. Professionals always remove the old carpet first.
3. How long does it take to install carpet?
For a professional crew, a standard bedroom often takes just 2-3 hours. A typical whole-house installation can usually be completed in a single day.
4. Do I need to move my furniture before the installers arrive?
You’ll need to remove small, fragile items like lamps and decor. The installation team will typically move the large furniture for you as part of the service.
5. What is the best carpet for pets?
Look for low-pile, tightly twisted synthetic carpets made of nylon or polyester. These materials are excellent at resisting stains, moisture, and wear from pet claws.
If you are a homeowner asking, “What is the single best upgrade I can make to increase my home’s value?”, the answer is literally under your feet. Think about it. What’s the first thing you notice when you first enter a house? Is it the paint color? The light fixtures? More often than not, it’s the floor beneath your feet. This is why choosing the right ideas for floors for homes is not just about looks; it is an important financial decision.
But with so many modern home flooring ideas out there, how do you know which one is the right investment for you? Don’t worry, we’ve got you covered. In this guide, we’re going to walk through the most exciting flooring trends 2025 is bringing our way. We will explore everything from timeless hardwood to innovative waterproof planks, giving you a clear roadmap to a more valuable and beautiful home.
Why Flooring Upgrades Matter for Home Value
So, now we can agree that floors make a powerful first impression. But you might still be thinking, “How much of a difference can they really make on my home’s price tag?” The answer might surprise you. Think of your flooring as the canvas for your entire home. A stained carpet or scratched-up floor makes buyers see a project and a pile of future expenses, instantly lowering their offer.
On the flip side, beautiful, well-maintained floors make a home feel move-in ready and well-cared-for. This idea is everything. In fact, data from top real estate sources constantly shows that projects like refinishing hardwood floors can recover over 100% of their cost at resale.
Now that you see the why, let’s get into the what. In the next section, we’ll unpack the specific flooring ideas for homes that are turning heads and driving up values in the current market.
Flooring Trends 2025: What’s in Style Now
So, which current flooring trends offer both style and value? The newest flooring trends focus on practical beauty. Let’s explore the looks defining the year.
Wood Flooring Trends 2025
Wood flooring trends in 2025 are all about warmth and authenticity. Think light white oak and honey-toned walnuts with matte finishes. Wide planks remain a top choice for modern home flooring ideas, creating a sense of spacious, organic warmth.
Vinyl Flooring Trends 2025
Vinyl flooring trends in 2025 deliver incredible realism with superhero durability. Today’s luxury vinyl plank features realistic wood textures and matte finishes. It’s the go-to for modern home flooring ideas that need to be 100% waterproof and pet-proof without sacrificing style.
Tile & Stone Trends
The latest trend flooring in tiles uses large-format pieces for a clean, seamless look. Designs mimic natural stone or concrete, supporting modern home flooring ideas with their minimalist elegance and easy maintenance.
Top Flooring Options That Increase Home Value
Now that you’ve seen the hottest styles for 2025, let’s get down to the nitty-gritty. Which of these flooring ideas for homes actually boost your bottom line? Here’s a straightforward breakdown of your best options.
Solid Hardwood: The Classic Investment
Solid hardwood is the gold standard for a reason. It’s timeless, durable, and buyers love it. While it comes with a higher upfront cost, its ability to be refinished multiple times means it can literally last a lifetime. This is a long-term investment that consistently ranks as a top feature for buyers, making it one of the most popular flooring in new homes and older ones alike.
Engineered Hardwood: The Practical Sibling
If you love the real wood look but need more versatility, engineered hardwood is your answer. It’s constructed with a real wood layer on top of a stable plywood base, making it less prone to warping with humidity changes. This makes it a fantastic choice for basements or areas where solid wood might be risky. It gives you that authentic feel with added peace of mind.
Luxury Vinyl Plank (LVP): The Modern Powerhouse
Remember those Vinyl flooring trends 2025 we discussed? This is where they shine. LVP is the ultimate fusion of style and resilience. It’s 100% waterproof, incredibly scratch-resistant, and so realistic that it often fools the eye. For busy households with kids and pets, it’s arguably the smartest, most practical choice on the market today.
Porcelain & Ceramic Tile: The Durability King
For moisture-prone areas like bathrooms, kitchens, and mudrooms, tile is unbeatable. Porcelain tile, in particular, is incredibly dense and resistant to stains, moisture, and wear. Following the latest trend flooring of large-format tiles, you can create a sleek, almost seamless look that is both beautiful and brutally tough.
Carpet: The Cozy Nook Specialist
While not the star for main living areas, carpet still has its place. In bedrooms and upstairs lofts, it provides warmth, comfort, and noise reduction that hard surfaces can’t match. The key is to choose a high-quality, stain-resistant carpet and confine it to these “cozy zones” to maximize its appeal.
Room-by-Room Flooring Ideas for 2025 Homes
You wouldn’t wear snow boots to the beach, right? The same logic applies to your floors. Now that we’ve covered the best materials, let’s match them to the right rooms. Tailoring your flooring ideas for homes by function is the secret to a home that’s both beautiful and brilliantly practical.
Entry & Living Areas: Your Home’s First Handshake
This is your home’s first impression, so durability and style are key. You want a floor that can handle foot traffic while wowing guests. Hardwood or its convincing counterpart, LVP, are perfect ideas for floors for homes here. They are easy to clean and set a sophisticated tone for the entire house.
Kitchen & Dining: Where Spills Happen
In these busy hubs, your floor needs to be a superhero. Spills, dropped dishes, and high traffic are a daily reality. This is where those waterproof modern home flooring ideas truly pay off. Luxury Vinyl Plank (LVP) or durable porcelain tile are your best bets, combining resilience with the warm look of wood or stylish stone visuals.
Bathrooms & Laundry: The Moisture Masters
For these spaces, being 100% waterproof isn’t just a feature—it’s a requirement. Porcelain or ceramic tile is the classic, unbeatable choice. However, modern waterproof LVP is a fantastic alternative that provides a warmer feel underfoot while handling humidity with ease.
Bedrooms & Upstairs: Comfort is King
After all that tough talk about durability, let’s talk comfort. This is your sanctuary. Here, softness and noise reduction take priority. A plush, high-quality carpet is a wonderful choice for bedrooms. If you prefer hard surfaces, hardwood or LVP with a large, cozy area rug offers a perfect blend of comfort and style.
Basement & Utility Spaces: The Dry Defense
Basements and utility rooms are prone to moisture and temperature shifts. Your flooring must be resilient. Engineered hardwood, luxury vinyl plank, or tile are the top contenders here, as they are specifically designed to resist moisture and perform well in below-ground environments.
Cost, ROI & What To Expect in 2025
So, we’ve picked the perfect floors for every room. Now, let’s talk numbers. You’re likely thinking, “What kind of investment are we looking at, and what will I get back?” It’s a smart question. Understanding the cost and potential return helps you make a choice that makes sense for your budget and your home’s future value.
Here’s a quick look at what you can expect per square foot for materials and professional installation:
Luxury Vinyl Plank (LVP): $3 – $7
Laminate Flooring: $3 – $7
Carpet: $4 – $9
Engineered Hardwood: $5 – $10
Porcelain/Ceramic Tile: $8 – $15
Solid Hardwood: $8 – $15
As for your return, projects that align with the 2025 Flooring trends we discussed—like refreshing hardwood floors or installing high-quality LVP—typically offer the strongest ROI. The key is to spend smart. You don’t always need the most expensive option. Often, choosing a durable, on-trend material that fits your home’s style and your local market will give you the best bang for your buck when it’s time to sell.
Build Your Home’s Value from the Ground Up
And there you have it! From the warm, natural tones leading the 2025 Flooring trends to the practical magic of waterproof vinyl, you’re now equipped with the knowledge to choose floors that look incredible and build your home’s value. Remember, the best choice always balances current style, your lifestyle needs, and smart financial sense.
Whether you’re restoring the character of an older home or building your dream modern space, your floors are the foundation of it all. They are the silent workhorse that welcomes you home every day and the powerful first impression that welcomes potential buyers tomorrow.
Ready to take the next step? We recommend chatting with a trusted local flooring professional. They can provide specific samples and quotes to help you visualize these ideas for floors for homes in your own space, making your path to a more beautiful and valuable home smooth and simple.
Flooring plays a major role in the comfort, beauty, and long-term value of your home. As we move into 2026, homeowners are choosing flooring materials that are not only stylish but also durable, sustainable, and appealing to future buyers. If you are planning a renovation or preparing your home for resale, choosing the right flooring can significantly increase your property’s value, enhance modern living comfort, and reduce maintenance costs.This detailed guide explains the best home flooring ideas for 2026, why they matter, how much they cost, and where they work best in your home.
Why Flooring Matters in Home Value
Real estate professionals consistently note that updated flooring is one of the top three upgrades that influence buyer decisions, alongside kitchens and bathrooms. Here’s why flooring impacts property value:
Reason
Impact
Visual Appeal
Makes interiors look clean, updated, and cohesive
Durability
Buyers pay more for low-maintenance, long-lasting floors
Comfort & Lifestyle Fit
Flooring affects noise, warmth, and everyday usability
Market Trends
Modern styles attract more buyers and better offers
1. Engineered Hardwood Flooring
Engineered hardwood remains one of the most desirable flooring choices in 2026, both for homeowners living in the space and for future resale potential. It offers the luxury and warmth of real hardwood, while delivering improved durability and stability compared to traditional solid wood flooring. The construction features a real hardwood veneer on top of a stable, multi-layered core. This layered structure minimizes expansion and contraction, which makes engineered hardwood suitable for a wide range of climates and interior conditions.
Why Engineered Hardwood Increases Home Value
Engineered hardwood flooring consistently ranks as one of the most value-adding home upgrades. Homebuyers recognize hardwood as a premium material, and many actively look for it when comparing properties.
Advantage
Impact on Home Value
Authentic wood appearance
Creates luxury visual appeal that shows well in listing photos and tours
Stable in humidity changes
Reduces long-term maintenance issues that buyers want to avoid
Compatible with radiant heat
Works with modern heating systems found in updated homes
Broad buyer appeal
Increases buyer interest and can shorten days-on-market
Homes with hardwood flooring frequently appraise higher and generate stronger buyer offers because buyers see it as a premium, long-lasting upgrade.
Best Colors & Styles for 2026
Color trends are shifting toward natural, airy, and calm interior palettes. These tones help spaces feel more open and modern.
Wide planks continue to dominate design trends because they give rooms a clean, seamless, and high-end look.
Where Engineered Hardwood Works Best
Engineered hardwood is versatile and visually unifying, making it ideal for main living zones:
Living Rooms: Creates a warm, welcoming foundation for décor
Bedrooms: Adds comfort and elegance
Hallways and Staircases: Enhance visual flow throughout the home
Dining Rooms: Supports both formal and casual styling
For bathrooms and laundry rooms, it is typically best to use tile or waterproof flooring because of direct water exposure.
Cost Range
Installed Cost:$6 – $14 per sq ft Pricing varies based on:
Wood species (oak, walnut, hickory, maple)
Thickness of the wear layer (2mm–6mm+ for longer refinishing life)
Installation type (nail-down, floating, glue-down)
Finish type and texture
Higher wear-layer thickness provides longer lifespan and better refinishing potential, making it a stronger value investment.
Value Insight
Engineered hardwood is one of the few flooring options that:
Enhances everyday livability
Photographs beautifully in real estate listings
Signals “quality home” to buyers instantly
This is why real estate agents and appraisers consistently rank hardwood flooring upgrades as improvements that yield one of the highest returns on investment in home renovation.
2. Luxury Vinyl Plank (LVP) for Style, Durability, and Everyday Living
High-end Luxury Vinyl Plank (LVP) has become one of the most popular flooring choices heading into 2026 not just for its affordability, but for its impressive performance and visual realism. Modern LVP is designed to mimic the look and texture of hardwood or natural stone, yet it offers a level of durability and water resistance that makes it ideal for busy households.
LVP has evolved significantly in the last decade. Today’s premium styles include deep wood grain textures, matte finishes, beveled edges, and subtle color variation that closely resemble real hardwood. This allows homeowners to achieve a high-end design look while maintaining a low-maintenance lifestyle.
Why Homeowners Choose LVP
Luxury Vinyl Plank offers a balance of beauty and practicality that appeals to both current homeowners and future buyers:
Benefit
Why It Matters
Waterproof construction
Safe in kitchens, bathrooms, laundry rooms, and basements
Scratch & dent resistant
Excellent for homes with pets and children
Soft and comfortable underfoot
More comfortable than tile for daily living
Quiet flooring
Built-in underlayment reduces sound between rooms
Wide design options
Works with rustic, coastal, modern, and farmhouse interiors
This combination of appearance + performance makes LVP a high-value upgrade, especially when selling a home.
Ideal Use Areas
Luxury Vinyl Plank is especially suitable for:
Kitchens: Handles spills and heavy traffic
Entryways & Mudrooms: Resists dirt, moisture, and shoes
Basements: Waterproof and stable, where hardwood may warp
High-traffic Living Areas: Stays attractive even with daily use
Condos & Apartments: Quiet and comfortable for shared walls/floors
Unlike traditional wood, LVP does not expand or contract dramatically with humidity, which makes it a reliable choice in various climates.
Design Trends in LVP for 2026
Homeowners are selecting:
Warm, natural oak tones
Matte and low-gloss finishes (no plastic shine)
Wide and long planks to visually expand small rooms
Light neutral colors to achieve bright, airy interiors
These finishes pair well with both modern and traditional furniture styles.
Cost & Installation
Typical Installed Cost:$3 – $8 per sq ft Pricing depends on:
Thickness of wear layer (12mil to 30mil+)
Whether acoustic underlayment is included
Whether the installation is click-lock floating or glue-down
LVP is often faster and less expensive to install than hardwood or tile, which keeps renovation budgets flexible.
Value Insight
Luxury Vinyl Plank increases perceived home value when:
The plank color complements the wall and trim tones
Room transitions are smooth and clean
The style closely matches the look of real hardwood
LVP provides a high-end look with long-term resilience, which appeals strongly to buyers who want beauty without high maintenance.
3. Large-Format Porcelain Tile for a Clean Modern Luxury Look
Large-format tile continues to trend into 2026, especially in modern, minimalist, and spa-inspired interiors. Unlike traditional small tiles, large-format tiles (24”x24”, 24”x48”, and even custom oversized panels) create a smooth and uninterrupted look that visually opens the room. This makes spaces appear bigger, cleaner, and more luxurious with fewer visible grout lines.
Why Homeowners and Buyers Prefer Large-Format Tile
Large-format tile is more than a style choice. It provides long-term durability and an elevated architectural finish.
Advantage
Why It Matters
Minimal grout lines
Creates a sleek, continuous look that feels spacious and premium
High durability
Resistant to scratches, stains, and daily wear
Waterproof surface
Ideal for moisture-heavy areas like kitchens and bathrooms
Wide design variety
Available in stone, marble, concrete, matte, and polished finishes
Low maintenance
Easier to clean due to fewer grout joints
This combination of practicality and visual luxury makes large-format tile a strong value-adding material for homeowners planning to sell in the future.
Popular Style Directions for 2026
Marble-look porcelain for a spa-like, soothing atmosphere
Matte concrete-look tile for modern, minimalist homes
Travertine-look tile for warm, Mediterranean-inspired interiors
Textured stone-look finishes for natural depth and character
Choose neutral tones (warm beige, soft gray, white stone) to maximize resale appeal.
Where Large-Format Tile Works Best
Large-format porcelain tile performs exceptionally well in:
Bathrooms (luxury hotel-style flooring and walls)
Kitchens (easy to clean and highly durable)
Entryways and Mudrooms (handles dirt, wet shoes, and heavy foot traffic)
Laundry Rooms (water-resistant and low-maintenance)
For cohesive design, consider extending the same tile onto walls in showers or behind bathtubs to create a continuous spa-inspired effect.
Cost & Installation Considerations
Typical Installed Cost:$4–$12 per sq ft Costs vary by:
Tile size & thickness
Pattern complexity (straight-set vs herringbone or staggered)
Subfloor preparation
Because large-format tiles require precise layout and leveling, hiring a qualified tile installer is recommended to avoid lippage (uneven tile edges).
Value Insight
Large-format tile can visually raise the perceived value of a home, especially when paired with:
Clean, minimal décor
Soft LED lighting
Natural wood and warm textiles
Buyers often associate this look with premium new construction, making your home feel more current and luxurious.
4. Eco-Friendly Flooring Materials (Growing Demand in 2026)
Sustainability has moved from a design preference to a major decision factor in home upgrades. More homeowners are prioritizing materials that are responsibly sourced, low in chemicals, and long-lasting. The result is a strong increase in demand for eco-friendly flooring options, especially among younger buyers and families who value health and environmental responsibility. Choosing sustainable flooring today positions your home as modern, conscious, and future-buyer ready.
Popular Eco-Friendly Flooring Options
1-Bamboo Flooring
Bamboo grows significantly faster than traditional hardwood trees, sometimes reaching maturity in as little as five years. This makes it one of the most renewable flooring resources available.
Durable and resistant to everyday wear
Available in many stains and grain patterns
Works well for contemporary and natural interior styles
Best Uses: Living rooms, bedrooms, hallways Care Tip: Maintain stable indoor humidity to preserve finish.
2-Cork Flooring
Cork is harvested from the bark of the cork oak tree, which continues to grow after harvesting, making this a low-impact material. It feels soft and cushioned underfoot, reducing pressure on joints and providing better sound insulation than wood or tile.
Noise-reducing
Comfortable to stand on for long periods
Naturally resistant to mold and mildew
Best Uses: Bedrooms, playrooms, home offices
Care Tip: Use UV protection blinds in strongly lit rooms to prevent fading.
3-Reclaimed Hardwood
Reclaimed hardwood is sourced from old barns, factories, and historic buildings. Each plank carries unique grain patterns, nail marks, or age streaks, giving the floor a character-rich appearance that cannot be replicated in new boards.
Eco-conscious and full of personality
Long lifespan due to aged, dense wood fibers
Adds authenticity and uniqueness to interiors
Best Uses: Living rooms, dining rooms, feature flooring in entryways Care Tip: Seal with a natural oil finish to preserve its history and depth.
4-Wool Carpet
Wool is a renewable, biodegradable, and chemical-free material that provides comfort and natural insulation. It regulates temperature, improves acoustic comfort, and is naturally flame-resistant without synthetic treatments.
Soft and premium feel
Durable and stain-resistant when properly maintained
Ideal for warm and cozy spaces
Best Uses: Bedrooms, lounges, upper-level hallways Care Tip: Vacuum regularly and use mild natural cleaners.
Why Eco-Friendly Flooring Increases Home Value
Buyers are moving toward homes that feel healthy, natural, and responsible. Sustainable flooring tells a buyer that your home was built or renovated with long-term stewardship in mind without quick fixes.
Buyer Priority
How Eco Flooring Supports It
Health & Indoor Air Quality
Low-VOC, natural materials reduce exposure to chemicals
Environmental Responsibility
Renewable and reclaimed materials reduce impact
Modern Lifestyle Appeal
Sustainability aligns with current home design expectations
Long-Term Value
Durable, high-quality materials age better over time
Homes updated with eco-friendly flooring often photograph better, show better during tours, and inspire emotional connection with buyers, which can directly translate to stronger offers.
5. Mixed-Material Flooring for Functional Zoning (Expanded Section)
Modern homes, especially those with open layouts, often combine multiple living areas into one big shared space. Without physical walls, it can sometimes be hard to visually separate where one area ends and another begins. Mixed-material flooring, also known as functional zoning, solves this by using different flooring types to define each space clearly while still maintaining a unified design theme.
Why This Trend Is Growing in 2026
Buyers and homeowners are prioritizing:
Flow between rooms
Practical floor performance (e.g., waterproof flooring in wet areas)
Intentional design
Zoning the floor helps a home look well-designed, thoughtfully organized, and easier to navigate.
Practical Example Layout
Area
Best Flooring Choice
Why It Works
Living Room
Engineered Hardwood
Warm, welcoming, high resale appeal
Kitchen
Porcelain Tile
Waterproof, easy to clean, heat and spill resistant
Mudroom / Entryway
Luxury Vinyl Plank (LVP)
Durable, scratch-proof, handles dirt and shoes
This combination ensures each part of the home supports everyday use while still looking visually cohesive.
How to Keep the Look Seamless
To avoid the flooring change looking abrupt:
Choose flooring with matching undertones (warm with warm, cool with cool)
Use flush transitions or low-profile metal edge trims
Keep patterns simple so the space feels continuous
Design Trick
If your living room hardwood is a warm oak tone, choose:
Kitchen tile in warm beige or stone-gray
LVP in the mudroom with a wood-grain pattern similar to your hardwood tone
This keeps the home visually connected even with different materials.
Why Mixed-Material Flooring Increases Home Value
Real estate agents note that buyers appreciate:
Purposeful design
Ease of cleaning
Right material in the right space
It shows the home was updated with practical, long-term living in mind, not just temporary cosmetic changes. Functional zoning also protects hardwood in areas where spills or moisture are likely to occur, extending lifespan and reducing replacement costs.
How to Choose Flooring Based on Your Home’s Needs
Before selecting flooring, consider your lifestyle:
Lifestyle
Best Flooring Type
Pets + Children
Luxury Vinyl Plank or Tile
High Humidity Home
Engineered Hardwood or Tile
Low-Maintenance Preference
LVP or Cork
High Resale Priority
Engineered Hardwood
Maintenance Matters (This Boosts Value Long-Term)
Even the best flooring needs proper care to maintain its beauty and value. Since Almaraz Hardwood Flooring specializes in quality flooring installation, we recommend learning the right cleaning methods.
To maintain hardwood specifically, here is a guide you should follow:
Choosing the right flooring is one of the smartest ways to enhance your home’s comfort, beauty, and long-term value. Whether you prefer the natural elegance of engineered hardwood, the durability of LVP, or the modern luxury of large-format tile, the key is selecting a style that supports your lifestyle and appeals to future buyers.
Frequently Asked Questions
Q1: What makes engineered hardwood different from solid hardwood? Engineered hardwood has a real wood top layer bonded to a multi-layered core, which makes it more stable in changing temperatures and humidity. It looks just like solid hardwood but resists warping and movement much better.
Q2: How long does engineered hardwood flooring last? High-quality engineered hardwood can last 20–40 years or more. Longevity mostly depends on the thickness of the wear layer. Thicker wear layers can be refinished several times, extending lifespan significantly.
Q3: Can engineered hardwood be refinished? Yes, it can — as long as the wear layer is thick enough.
2mm–3mm wear layer: Light refinishing only
4mm–6mm wear layer: Multiple full refinishes possible
This is why selecting the right product matters for long-term value.
Q4: Is engineered hardwood good for homes in humid or coastal climates? Engineered hardwood is specifically designed to handle humidity fluctuations better than solid hardwood. The layered core prevents expansion, making it suitable for coastal areas, warm climates, and homes with seasonal moisture changes.
Q5: Can engineered hardwood be installed over concrete or radiant heating? Yes. Its construction makes it compatible with radiant floor heating systems and concrete slabs, where solid hardwood is often not recommended. This flexibility is one of the reasons it is preferred in modern home builds.
Q6: How do I clean and maintain engineered hardwood flooring? Engineered hardwood should be cleaned using gentle, non-acidic hardwood cleaning products, along with light sweeping or microfiber dusting.
Q7: Which rooms are not recommended for engineered hardwood? High-moisture zones such as full bathrooms, steam rooms, or laundry areas are better suited to tile or waterproof flooring options. For the rest of the home, engineered hardwood performs beautifully.
Q8: Do engineered hardwood floors really increase home value? Yes. Buyers consistently prefer hardwood flooring because it conveys quality, longevity, and timeless design. Homes with engineered hardwood often sell faster and at higher offers, especially when the flooring style matches current trends.
You saved up, you picked the perfect honey-toned oak, and you held your breath as the installers laid down those stunning planks. Now, your hardwood floors are the star of your home. But then, reality hits: a muddy paw print here, a mysterious scratch there, and that one area by the door that’s starting to look a little… dull. Sound familiar?
If you’ve ever found yourself asking out loud, “Hey Google, what is the best maintenance for hardwood floors?” – you’re definitely not alone.
The good news is that keeping your floors beautiful isn’t as complicated as it sounds. In this guide, we’ll walk through the simple, practical steps of wood floor care and maintenance together. We’ll answer all your big questions, starting with the basics like whether it’s truly safe to mop them, so you can feel confident and keep your wooden floors looking their best for years to come.
Know Your Hardwood Floors
Now that we’re on the same page about wanting to keep those floors gorgeous, the first and most important step is to get to know them a little better. You wouldn’t use shampoo on a leather jacket, right? In the same way, the best way to care for your floors depends on what they’re made of.
Think of it as a quick personality test for your home. There are three main types you’re likely to have:
Solid Hardwood
This is the classic. It’s a single, solid piece of wood from top to bottom. The great thing about this type is its resilience over the very long term, since heavily worn hardwood floors can be sanded down and refinished several times over decades, practically making them new again.
Engineered Hardwood
Don’t let the name fool you because the top layer is 100% real wood. It’s constructed like a plywood sandwich with a beautiful wood veneer on top. This makes it incredibly stable, especially in areas with moisture. However, that top layer is thinner, so it can only be refinished a few times.
Oiled Hardwood
This refers to the finish, not the construction. These floors have a matte, natural look because they’ve been treated with penetrating oils instead of a plastic-like coating (like polyurethane). They feel great underfoot but have different needs, which we’ll touch on soon when we answer, “How often should you oil your hardwood floors?”
Why does this matter so much? Because knowing your floor type stops you from making a costly mistake. For example, the advice you might get for what to wash hardwood floors with can differ, especially for oiled floors. It’s the foundation for everything else we’ll talk about.
What You Should Do to Maintain Hardwood Floors
Alright, now that you know whether you’re living with sturdy Solid, versatile Engineered, or touch-sensitive Oiled floors, let’s talk about the simple habits that keep them looking their best. This is the core of wood flooring maintenance that prevents big problems down the road.
Here’s your easy, go-to routine:
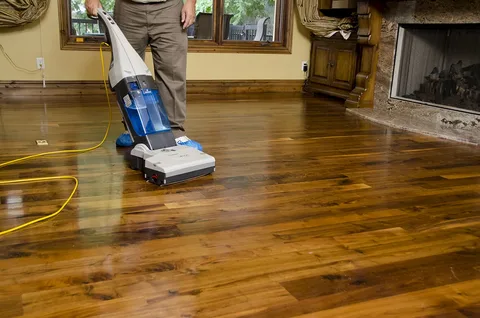
Daily Dusting: This is the single most important thing you can do. A quick pass with a dry microfiber mop or a soft broom does wonders. This kind of wiping floors daily picks up dust, pet hair, and that abrasive grit we talked about. It’s a five-minute task that pays off for years.
Smart Vacuuming: If you prefer a vacuum (and who doesn’t love a little tech help?), just make sure it has a setting for hard surfaces. Always turn off the rotating beater bar, as that thing is a scratch machine in disguise!
Bare Feet are Best: Get into the habit of taking off outdoor shoes. It’s the easiest way to stop dirt and small rocks from getting in. Placing a good mat at every entrance is your first line of defense, catching most of it before it even gets to your hardwood care and maintenance routine.
This simple playbook is your foundation. It keeps the daily grime at bay, which means when it is time for a more thorough cleaning, the job is much quicker and easier. And speaking of that, the question of “Should you mop hardwood floors?” is probably on your mind. Let’s tackle that head-on next.
What to Use (and What to Avoid) on Hardwood Floors
You’ve been doing a great job with the daily dusting, which is the perfect lead-in to this next topic. So, let’s answer that burning question: “Should you mop hardwood floors?”
The answer is a confident “yes, but…” The “but” is where most people go wrong. The key is to remember that you’re not washing a car; you’re damp cleaning a delicate surface. Using too much water is wood’s worst enemy, as it can seep into the seams and cause warping or clouding of the finish.
So, what should I use to clean hardwood floors when it’s time for a weekly refresh? Here’s the simple, safe method:
Pick the Right Cleaner: This is where you can’t go wrong. You need a cleaner made specifically for hardwood. These are pH-neutral and won’t leave a dulling film. A common question we get is about vinegar and water for cleaning hardwood floors. While it’s a popular DIY hack, it’s a risky one. Vinegar is acidic and, over time, can break down the protective finish, leaving your floors looking dull and vulnerable. It’s best to stick with products designed for the job.
The “Damp Mop” Technique: Here’s what cleans hardwood floors flawlessly without water damage. Spray a small amount of your chosen cleaner directly onto a microfiber mop head, not onto the floor itself. The mop should be just damp enough to pick up grime, not wet enough to leave any moisture behind. Gently glide it over the floor, following the direction of the wood grain.
This method safely lifts dirt without soaking the wood. And while we’re on the topic of what not to do, this brings us to one of the biggest modern mistakes in maintenance of hardwood floors.
Your Hardwood Care Calendar
Now that you’re a pro at the how, let’s talk about the how often. Having a simple schedule takes the guesswork out of your hardwood care and maintenance and ensures your floors get exactly what they need, right when they need it. Think of it like you changing your car’s oil regularly to prevent engine trouble; the same idea goes for your floors.
Here’s a simple timeline to follow:
Daily: Keep up the great work with a quick dry dust mop or vacuum (with the beater bar off!) to catch abrasive grit.
Weekly: This is when you do the safe, damp mopping we just talked about. A quick once-over with a hardwood-safe cleaner will maintain that fresh, clean look.
Monthly: Take a few extra minutes for a more attentive clean. Pay extra attention to high-traffic areas like entryways and hallways, and look for any spots you might have missed.
Every 6-12 Months (For Oiled Floors Only): This is the answer to “How often should you oil your hardwood floors?” If you have oil-finished floors, they need to be replenished with a fresh coat of specialty oil to keep them nourished and protected.
Every 3-5 Years (For All Floors): Even with perfect care, the top coat can wear down. This is when you might consider “recoating” to bring back the original shine and protection.
Common Mistakes to Avoid When Cleaning Hardwood Floors
You’re now equipped with all the right things to do for your floors. But sometimes, knowing what not to do is just as important. So, let’s get crystal clear on What should you not use on hardwood floors?
Here’s your essential “Don’t” list:
Don’t Use Vinegar or Steam: We’ve talked about vinegar, but it’s worth repeating. And you should absolutely avoid using steam cleaner on hardwood floors. The intense heat and moisture can force their way through the finish, causing the wood to warp and the planks to separate.
Don’t Let Spills Linger: When something spills, wiping floors immediately is the best thing you can do. Don’t let liquids, especially water, sit on the surface. A quick blot with a dry or slightly damp cloth is all it takes.
Don’t Go Abrasive: Stiff brooms, rough scrub pads, and abrasive cleansers are like sandpaper to your floor’s finish. They will create tiny scratches that build up over time, which make your floors look dull.
Don’t Use Wax or Polish: Unless your floor’s manufacturer specifically recommends it, these products will create a slippery, gummy buildup that actually traps dirt and makes proper cleaning impossible later on.
Your Lifetime of Beautiful Floors
Caring for your hardwood floors truly comes down to a few consistent habits, including daily dusting, safe damp mopping with the right cleaner, and avoiding harsh tools like steam mops or vinegar. By understanding your floor’s needs and sticking to a simple schedule, you protect your beautiful investment from wear and tear, ensuring it stays warm and inviting for years to come.
Even with the best care, years of life can leave their mark. If your floors have lost their charm or show signs of significant wear, the team at Almaraz Hardwood Flooring is here to help. We provide trusted Floor Refinishing services that can sand away years of scratches and dullness, restoring your beautiful hardwood to its original glory.
Frequently Asked Questions
1. What is the best thing to use to clean hardwood floors?
For daily care, use a dry microfiber mop. For weekly cleaning, a damp mop with a pH-neutral hardwood floor cleaner is best. Avoid vinegar and steam.
2. Can you use a steam mop on hardwood floors?
No. You should avoid using a steam cleaner on hardwood floors. The heat and moisture can warp the wood and damage the finish.
3. How do you clean hardwood floors without damaging them?
Stick to dry dusting daily and damp mopping weekly with a dedicated hardwood cleaner. Always wring out your mop thoroughly to avoid excess water.
4. Is it okay to mop hardwood floors?
Yes, you can mop hardwood floors, but the key is to use a damp mop, not a wet one. Too much water is the most common cause of damage.
5. How often do hardwood floors need to be oiled?
Only floors with an oiled finish need this care. They typically need to be re-oiled every 6 to 12 months to keep them nourished and protected.
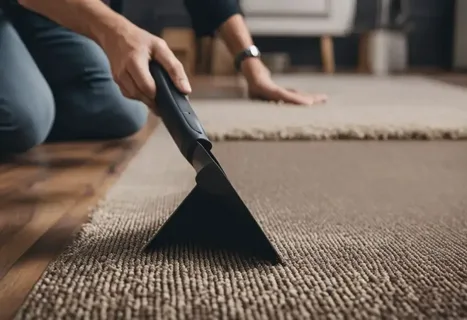
If you have ever looked at your laminate floors and thought, “They are beautiful, but I miss the soft warmth of carpet,” you are not alone. Many homeowners wonder if they can install carpet right over laminate flooring, and whether it is a smart long-term move.
The short answer? Yes, you can install carpet over laminate flooring, but only when done correctly. It’s a choice that blends comfort, style, and convenience, especially when guided by a professional carpet installer who understands subfloor structure and material compatibility.
In this guide, you’ll learn everything from the pros and cons to step-by-step expert installation tips, plus when it makes more sense to remove the laminate first.
Understanding Laminate Flooring Before Installing Carpet
Laminate flooring is a floating surface, meaning it is not glued or nailed down. It sits on top of an underlayment, allowing it to expand slightly with temperature and humidity changes.
This floating design is why installing carpet over laminate needs careful attention. If done wrong, the soft layers of carpet and padding can cause the laminate to shift, leading to wrinkles, squeaks, or uneven wear.
That is why most flooring contractors recommend inspecting your laminate first, a simple check that can save you from costly redos later.
Advantages of Installing Carpet Over Laminate
1. Saves Time and Labor Costs
You don’t need to tear out your laminate flooring, which means less mess, faster results, and lower flooring installation costs, which is a major win for homeowners.
2. Adds Instant Warmth and Comfort
If your home feels a bit cold underfoot, layering carpet over laminate adds instant coziness. With the right underlay, it even improves sound insulation, something every apartment owner and parent will appreciate.
3. Protects Existing Flooring
If you are renting or planning a renovation later, laying carpet over laminate is reversible. It protects your laminate from scratches, dents, and sunlight fading.
4. Perfect for Short-Term or Temporary Setups
For homeowners staging a property or tenants customizing a space, this method lets you get that “new floor” look without permanent changes.
Pro Tip: If you are planning to sell or rent your home soon, ask your local carpet installation service to use non-permanent tack strips instead of glue, which is easy to remove, easy to update.
Drawbacks to Consider
1. Laminate Movement Can Cause Carpet Ripples
Because laminate floats, it may flex slightly when stepped on. Over time, that movement can make carpet surfaces uneven if the underlay is too thick.
2. Possible Moisture Trapping
Moisture between the laminate and carpet can cause mold or swelling. Always ensure the room is well-ventilated and use a breathable underlay.
3. Height and Clearance Issues
Carpet and padding can raise floor height by half an inch or more. You might need to adjust door trims or baseboards to fit properly.
4. Limited Longevity for Heavy Carpet Types
Plush or high-pile carpets add more pressure to the laminate base, which can cause bending or squeaking over time.
Expert Advice: Always hire a certified flooring contractor who can assess the condition of your laminate and recommend the best carpet type to pair with it.
Step-by-Step: How to Install Carpet Over Laminate the Right Way
Step 1: Inspect Your Laminate
Check for loose planks, warping, or squeaks. If any section moves underfoot, secure it before starting.
Step 2: Clean Thoroughly
Vacuum and wipe your laminate to remove dirt, dust, and residue. A clean base means a smooth, even carpet finish.
Step 3: Choose the Right Underlay
Go for a thin, firm, and breathable carpet underlay — rubber or dense foam works best. Avoid thick padding, which can make the floor unstable.
Step 4: Secure Tack Strips
Place tack strips along the room’s perimeter. These will hold your carpet in place without damaging the laminate below.
Step 5: Lay and Stretch the Carpet
Roll out the carpet over your underlay and stretch it tightly using a carpet stretcher. This eliminates ripples and ensures a professional-grade finish.
Step 6: Adjust Transitions and Trim
You may need to shave door bottoms or add transition strips for a polished look and safe walking surface.
Pro Insight: If this feels complex, search for carpet installation services that can complete the process in just a few hours, often with better results and warranty coverage.
When You Should Not Install Carpet Over Laminate
Skip this method if:
Your laminate is swollen, uneven, or water-damaged.
The room has high humidity (like basements or bathrooms).
You are installing a permanent, wall-to-wall carpet that needs direct adhesion to the subfloor.
In these cases, removing the laminate first is safer and more durable. It ensures the new carpet lasts longer and stays perfectly smooth.
Tip: Ask your local flooring installation contractor for a quote on laminate removal because it’s often more affordable than you think, and they’ll prep the subfloor properly.
Smart Alternatives
Not ready for full carpeting? Try these instead:
Area Rugs: Add warmth and texture without permanent installation.
Carpet Tiles: Great for DIYers; easy to remove or replace later.
Layered Rugs: Combine patterns and materials for a cozy designer look.
These give your home that “soft underfoot” feel, minus the full installation process.
Quick Comparison
These give your home that “soft underfoot” feel, minus the full installation process.
Factor
Carpet Over Laminate
Carpet After Removing Laminate
Cost
Lower
Higher
Durability
Moderate
Excellent
Moisture Safety
Needs Care
Safer
Ideal For
Renters / Temporary setups
Permanent installations
Final Thoughts
So, can you install carpet over laminate flooring? Yes, if you do it in the right way. It is an easy, cost-effective way to refresh your space and add comfort without removing your existing floor. Just remember: success depends on condition, underlay, and installation quality. Always hire a local flooring contractor or professional carpet installer who can save you from uneven results or long-term wear.
If you love the warmth of carpet but want to keep your laminate safe, consult a flooring expert before starting. They’ll help you choose the right materials and make your living space look flawless.